
(usually added last just prior to cloding the chamber).
under the coverslip with no bubbles.
| Materials Needed |
|
|||||||||||||||
|
Hybridization Chambers Lifter Cover Slips (Dust Free) 100 C Heat Source 65 C Heat Source for Hyb Chambers poly dA 10 mg/ml 20X SSC, 3X SSC 1 M HEPES, pH 7 10% SDS |
||||||||||||||||
Determine the volume of probe to prepare for your array using the chart to the right. Regular cover slips typically require half as much volume as lifter slips. Probe can be dried down to an appropriate volume for adding probe mix compoments. Add SDS last, just prior to denaturation to avoid preciptation on ice.
| Probe Mix: |
3X SSC 1 mg/ml poly dA (10 ug) 10-25 mM HEPES, pH 7 0.25% SDS |
Add SDS to probe and Denature at 95 C, 2 min.
It's important to cool the probe down before pipetting it onto the array, however you can't place it on ice because the SDS will precipitate. Spin the probe briefly to pellet condensation. Some microfuges which allow the tube to spin through air make a good way of rapidly cooling the tube to Room Temperature.
Place slides in array chambers and align cover slip over arrays. Check to make sure the slide is right side up. The spots can usually be visualized by breathing on the slide to fog the surface. Little spots of DNA can been seen as the fog evaporates.
|
|
|
|
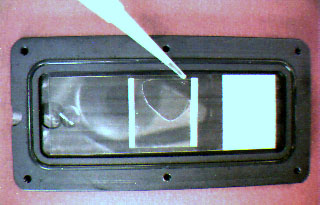
Notice the hydration spot near the left side of the slide (usually added last just prior to cloding the chamber). |
Lifter slips make pipetting the probe very easy. It wicks under the coverslip with no bubbles. |
Note: the new lifter slips are longer on one side than the ones shown in the picture above, and should be rotated 90 degrees so that the teflon strip is parallel to the long dimension of the slide.
Place the cover over the hyb chamber and tighten the sealing screws finger tight but snug. Be careful not to bump or jar the chamber. You don't want the hydration drop to merge with the cover slip and dilute out the probe, and you don't want the cover slip and probe to bump the side of the chamber and wick out along any surfaces. Gently place the chamber into a 65 C water bath. (Be careful not to burn yourself, if you act swiflty but gently you should have no problem, but putting on two gloves can help insulate your hand from the water). Alternatively you can use some kind of tool or rack for placing the chambers under water, or use another heat source such as a hot bonnet PCR machine, or incubation oven. (The screws are 4-40, so if you use a PCR machine as a heat block, the large knurled thumb screws can be replaced with regular short machine screws.)
Incubate the hybridization 8 hours to overnight.