
(usually added last just prior to cloding the chamber).
under the coverslip with no bubbles.
| Hybridization | Post Hybridization Washing |
|
Hybridization Chambers Lifter Cover Slips (Dust Free) 100 C Heat Source 65 C Heat Source for Hyb Chambers poly dA 10 mg/ml 20X SSC, 3X SSC 10% SDS |
3 Slide Wash Chambers Slide Rack 20X SSC 10% SDS Centrifuge that can spin plates at 500 RPM |
| Probe Mix: |
3X SSC 1 mg/ml poly dA (10 ug) 0.2% SDS |
notes Don't worry about the in-accuracy of adding sub-microliter amounts of 10% SDS. |
Add SDS to probe and Denature at 95 C, 2 min.
It's important to cool the probe down before pipetting it onto the array, however you can't place it on ice because the SDS will precipitate. Spin the probe briefly to pellet condensation. Some microfuges which allow the tube to spin through air make a good way of rapidly cooling the tube to Room Temperature.
Place slides in array chambers and align cover slip over arrays. Check to make sure the slide is right side up. The spots can usually be visualized by breathing on the slide to fog the surface. Little spots of DNA can been seen as the fog evaporates.
Pipet up 10-12 ul of probe and apply to array:
|
|
|
|
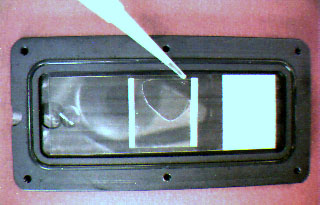
Notice the hydration spot near the left side of the slide (usually added last just prior to cloding the chamber). |
Lifter slips make pipetting the probe very easy. It wicks under the coverslip with no bubbles. |
Note: the new lifter slips are longer on one side than the ones shown in the picture above, and should be rotated 90 degrees so that the teflon strip is parallel to the long dimension of the slide.
Place the cover over the hyb chamber and tighten the sealing screws finger tight but snug. Be careful not to bump or jar the chamber. You don't want the hydration drop to merge with the cover slip and dilute out the probe, and you don't want the cover slip and probe to bump the side of the chamber and wick out along any surfaces. Gently place the chamber into a 65 C water bath. (Be careful not to burn yourself, if you act swiflty but gently you should have no problem, but putting on two gloves can help insulate your hand from the water). Alternatively you can use some kind of tool or rack for placing the chambers under water, or use another heat source such as a hot bonnet PCR machine, or incubation oven. (The screws are 4-40, so if you use a PCR machine as a heat block, the large knurled thumb screws can be replaced with regular short machine screws.)
If you're doing more than one hyb, it's not a bad idea to mark one of the screws with a sharpy to distinguish the chambers.
Incubate the hybridization 4 hours to overnight. 8 hours seems to be optimal.
Carefully remove the chamber and dry it down with paper towels. Water between the sandwich halves can be wicked out with paper towels. If you have several chambers to process, dry them off and remove the screws, but refrain from cracking open the covers until all chambers are ready to open. The time from opening the chamber, to the time the slide rack is immersed in the first wash should be minimized to prevent drying out of the probe. The slide chambers contain a small recess under one edge of the slide for prying the slide out of the chamber. Crack open the slide chamber and place the slide in a slide rack.
Once the cover slip is free, a few plunges up and down are suffucient to wash the slide. Move the rack to the second wash, and third wash with a few plunges each. The accumulated time of all three washes is usually less than five minutes. Even drying of the surface is important to avoid background problems. The centrifuge should be ready with a balance slide rack, and an empty rack padded with a paper towel. After the last wash, place the slide rack into the centrifuge and spin 5 minutes at 500 RPM.
Remove the slides and place them into a dust free box for scanning.